Showing posts with label homemade. Show all posts

Tuesday, April 14, 2015

Minecraft Cake


I enjoy making cakes and decorating them, tests my abilities to be creative. Now, I know nothing about this game, Minecraft, but one of the kids I work with is really into it and he was turning 13 so I wanted to make him a special cake for his special day of becoming a teenager. I tried Googling it to see what ideas would pop up to help me figure out how to decorate this cake. Now, there were some really neat ideas on there, but they seem to be ones that were very time consuming and I didn't have days to design this cake. I've also never worked with fondant and didn't want to start using it at a time where I'd have to roll and cut out hundreds of squares to make the all the little pixels that the game consists of.

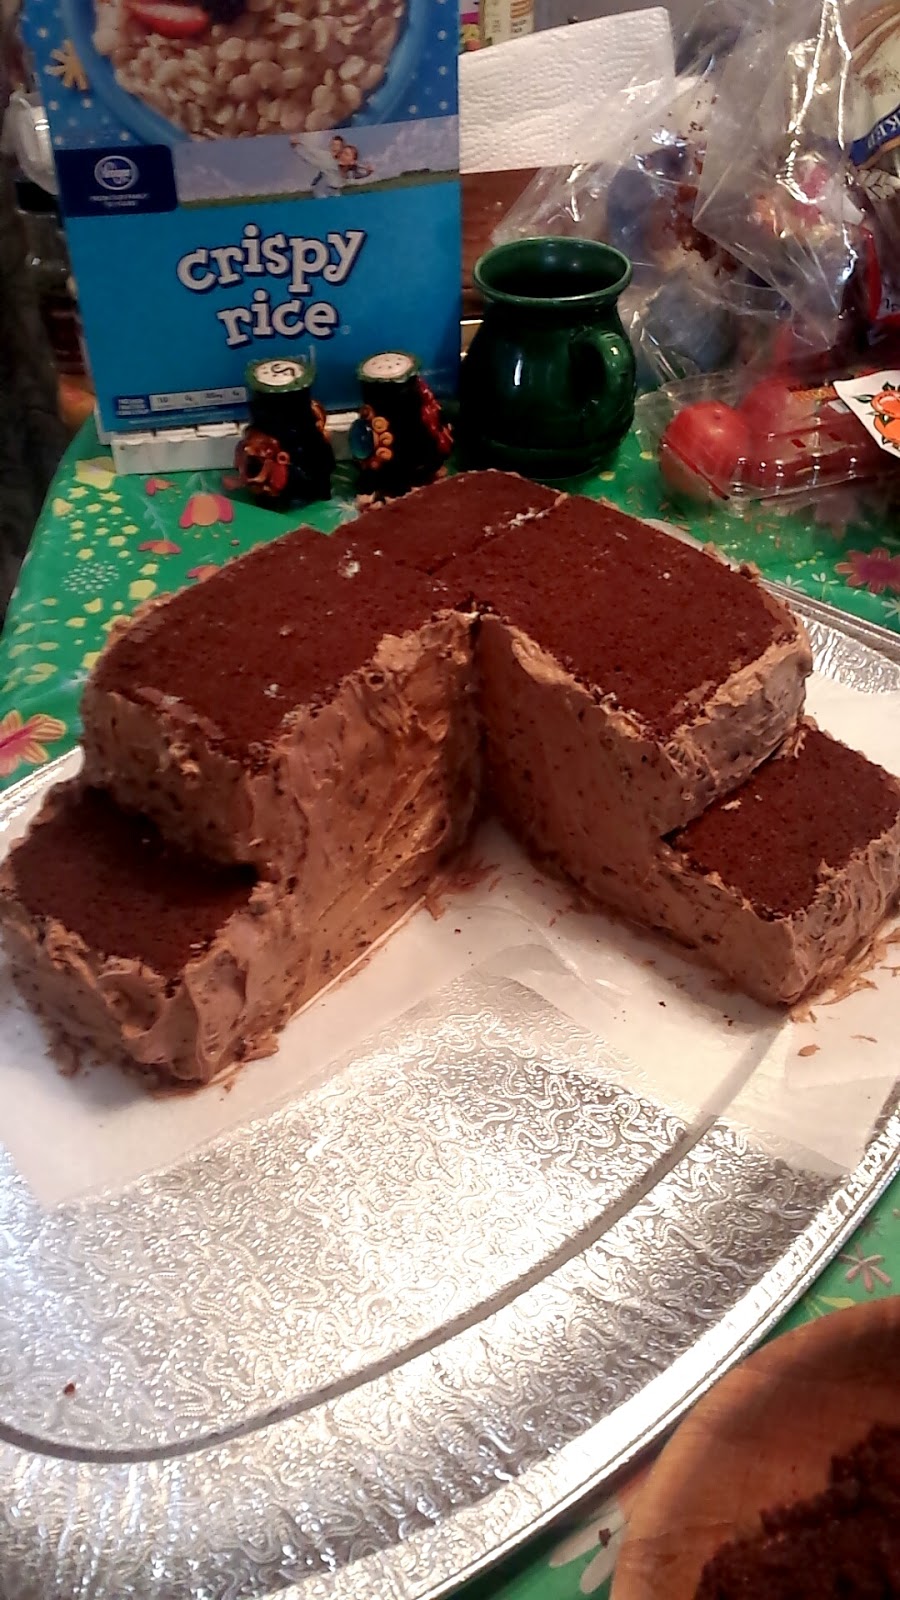
I decided to go with the cut up and layered cake to make it look like it came from a scene from the game. I decided to make 4- 9 in square cakes. I didn't have the time to go out and buy all the ingredients to make these so I used box cake mix to make it easier. However, I did take the time to make the icing from scratch because store bought icing is way to sweet and well, I just don't like it. I made chocolate cake and for the filling icing, I tried making a mint chocolate chip icing, that turned out pretty delicious. I'll add the icing recipe below. For the outer icing, I made a mix of vanilla and chocolate chocolate chip icing.

I made the cakes and threw them into the oven. It helps to put a square piece of parchment paper on the bottom of the pans and spray the sides with nonstick cooking spray so you don't find yourself with a rough bottom where parts stuck and you don't have an even square cake. Once they are completely cool, I cut the tops of the cakes off so they would be flat, since the middle usually rises, causing a hill and we want flat land for this cake. The tops I put aside and plan on making cake pops with them. With the flat squares, I put the icing in a plastic ziploc bag and cut the tip so it would squeeze out in a thick layer. I outlined the first square with the icing and then filled in the rest with more icing, laying one of the other pieces of cake on top. I repeated the same for the other two pieces of cake, so I ended up with two cakes filled with icing. Then I cut the cakes in half so I had 4 long pieces and cut two of them a bit shorter so I'd have a stair like effect, when layered. With the little bit of icing I had left, I used it to stick the pieces together.

Once it was in the shape that I wanted, I made another batch of icing, to cover the outside and make it look like one big piece instead of a few chunks. The second batch, I made just like the mint one, except I didn't put the peppermint oil in it. I used 1 tsp of vanilla extract instead. I also divided it into two parts 1/3 of it I added green food coloring to, to make the grass and the other 2/3 I added cocoa, to make it look like the dirt, as well as hand mixing in a handful of mini chocolate chips to make it look a little rocky.. Using cocoa made it a very light brown, not so much the dark dirt color that I was hoping for, so I took some of the cake that I had cut off earlier and crumbled it up and covered the chocolate icing with it. Make sure you don't cover the whole cake with it though. The tops of the pieces of cake should be covered with the green icing, piped on with the grass tip that you can find in the cake decorating section of a craft store or possibly even Walmart. I only needed one batch of icing to cover the whole cake but I really had to stretch it, so be careful when icing it so you don't run out. You can tell by looking at the picture, how the icing goes.

I tried making green rice krispy treats and wrapping them around KitKat sticks to make square trees like I saw online, but the rice krispy treats ended up being too heavy and made the trees sink into the cake, so instead, I made them into green slime cubes that you can find in the game. I think it ended up working better that way anyway. I also had little chocolates that looked like pieces of gold from the game that I put around the cake.

I was trying to figure out what to put on top of the cake since trying to make any character from the game out of gum paste was going to be impossible with the little amount of time I had to get it decorated and all the little figurines that you can buy of them, he already owned. So I found 3-D cardboard cutouts that you can buy and assemble and they worked perfectly. Once it was all done, I got a simple tube of icing, the kind that doesn't taste good, but it's good to write on cakes with and wrote Happy Birthday.

*NOTE: I needed to transport this across town and it didn't do well traveling 25 minutes, in the sun and going over bumps, but it was fixable. It'd probably be easier to have everything ready and bring it to your destination, if you need to move it, before assembling it with the outer icing. Or if you have someone to hold it for you and they can stay completely still, you'll be good too.


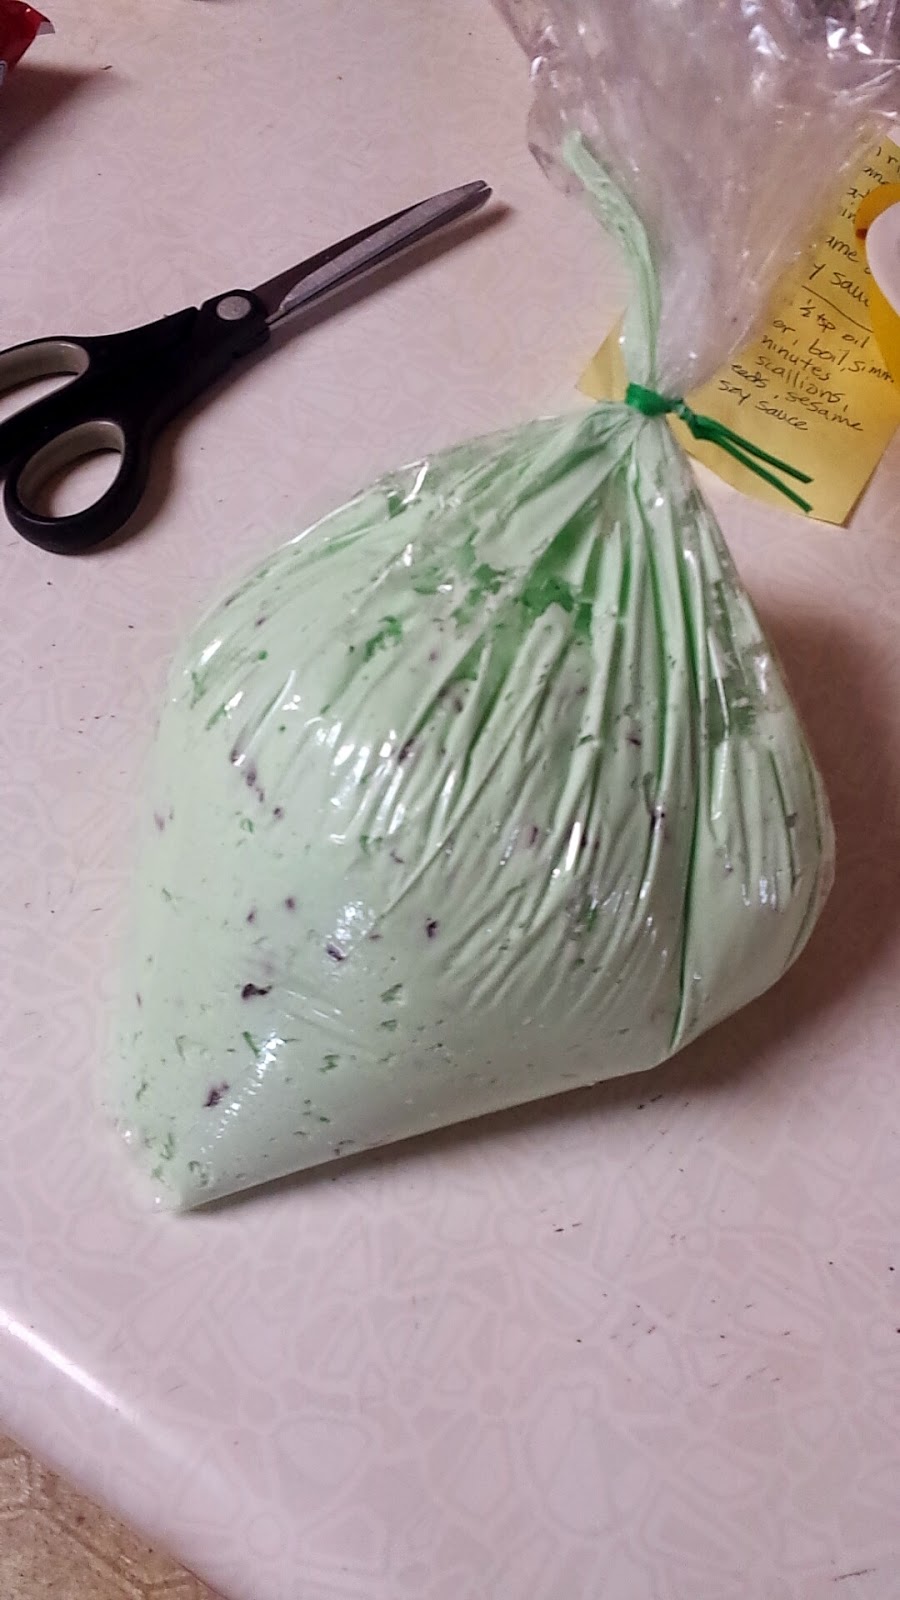
Mint Chocolate Chip Icing:
2 sticks of butter, room temperature
4 cups powdered sugar, sifted
2 tbsp milk
4-5 drops peppermint oil
3-4 drops green food coloring
1 cup mini chocolate chips

In the mixer, whip butter for 4-5 minutes until light and fluffy. Add powdered sugar a cup at a time along with the peppermint oil and food coloring. Add milk accordingly, if you feel it's too thick. Once all is mixed, beat another 3-4 minutes. Remove from mixer and hand mix in the mini chocolate chips.

*You can find the peppermint oil with the cake/candy making supplies at any craft store. You can also use peppermint extract from the grocery store, it's just not as strong and you may need to add more drops.

Monday, March 9, 2015

Homemade Pizza

I think homemade always tastes better than store bought. Awhile back, an ex's parents gave me a recipe for an I guess, semi-homemade pizza. I thought I'd give it a shot and I haven't made pizza any other way since. I'm not a big fan of tomatoes so I much rather have white sauce or a pesto or even bbq sauce on my pizza than just typical tomato sauce. That's probably why I like making my own pizza so much. That and the fact that when you go to Pizza Hut or Dominos, they don't put many toppings nor do they put a lot of cheese that I like. This is a pretty easy way to make pizza at home and the topping possibilities are endless. I've made this recipe many times and have tried different sauces and different toppings and it has always turned out great.


I was originally taught to use this pizza kit. It comes in a box and is pretty cheap, but I only needed the dry ingredients in it to make the crust. I didn't use the cheese or the sauce or anything so it got to the point where I just started buying the cheap packs of pizza crust mix that usually cost under $1 and bought everything separate. If you are making your pizza with tomato sauce and you want pepperoni on it, then your better off buying this box and just buying some more toppings and some cheese to go with it.

To make the crust, follow the directions on whatever packet of dry ingredients you end up buying. I like to add garlic powder to mine to make it taste more like a breadstick. When the dough is mixed, drop about a tsp of canola oil on top the ball of dough, cover it with saran wrap and let it rest for 20 minutes.

While it's resting, prepare your toppings. Make sure if you're putting any kind of meat on your pizza that it is precooked. Don't put raw because the pizza doesn't cook long enough to thoroughly cook it. A few combinations that I've tried and really liked are:
  • bbq sauce, shredded chicken, olives, pineapple
  • white sauce, olives, ricotta cheese, spinach, ground turkey
  • basil pesto, shredded chicken, ricotta cheese, olives, cilantro
  • white sauce, ham, pineapple, olives
  • white sauce, ricotta cheese, crumbled bacon, olives
  • tomato sauce, pepperoni, turkey sausage, ham
 Preheat the oven to 400. Roll out or stretch the dough on a floured surface until it's about 12" round or will fit your pizza pan. Spray the pan with nonstick cooking spray and lay the dough out, folding up the edges to make a crust. You can also add cheese to the inside of the crust if you'd like. Use a fork and poke holes throughout the dough so air can circulate and your dough won't bubble up. Spread a layer of sauce evenly over the dough. Cover with you toppings. I like a lot of toppings so my pizzas are always pretty thick where you can't see much of the sauce anymore. Put it in the oven for 10-15 minutes. Take it out and cover your pizza with cheese. I usually buy a 2 cup bag of shredded mozzarella or pizza cheese and use the whole bag because I like a lot of cheese. Put it back in the oven and cook for another 15-20 minutes or until the cheese is lightly golden. Take out and let it set for 10 minutes. If you cut it right away, it'll fall apart, especially if you have a lot of stuff in it. I've learned from experience. Plus, it'll be too hot to eat anyway. Use a pizza cutter and cut the pizza into 6 pieces. That's usually the best size where it won't fall apart.

*Reheating leftovers: it tastes best if you put it on a baking sheet and pop it in the oven at 400 for about 10 minutes, but the microwave will do too, it just won't be crispy like it's straight out of the oven.


Christmas Cookies

Christmas time is one of my favorite times of year. I love to cook and bake and this is the time that I can go all out baking and have fun with it. On average, I make 10-15 different kinds of cookies every year and they always seem to be a hit with all my family and friends. Some are old favorites and some I find throughout the year and want to change it up and try something new.

Venetians or 7-layer cookies
Eggnog Thumbprints
Florentines
Rudolphs
Holly Clusters
Rice Krispy Balls
Russian Teacakes
Bakeless Fruitcake
Santa's Whiskers
Hungarian Cookies
Pecan Tassies
Lemon Pretzels
Red Velvet
Macadamia Nut Cookies
Raisin Cookies


With such a variety of cookies, it makes for a very good presentation and everybody seems to be so impressed, when majority of the cookies are so easy to make. The only few that take some time to do, are the Venetians, Pecan Tassies, and the Hungarian cookies.

Friday, March 6, 2015

Crock pot Sweet Potato, Turkey and Quinoa Chili


Quinoa....this stuff is....different. I wanted to start cooking healthier and I started researching different grains that are better for you than others. I came across quinoa. I wasn't sure how it tasted and it was fairly new to hit popularity so not many people knew much about it. I originally tried it plain, without any seasonings or sauces because I wanted to see how it tasted. I didn't like it. But I didn't want to rule it out quite yet so I searched on Pinterest for recipes that looked good and could ease me into eating it and I came across this one for a chili where it was mixed with sweet potatoes and ground turkey and I actually really liked it. Most people may not like the initial taste of quinoa, but when you season it right and mix it with other things, it does taste pretty good. I decided to give this chili a try and tho I don't like beans I was able to omit them and still have a tasty meal. If you want the original with the beans in it like typical chili has, click on the link  http://iowagirleats.com/2014/01/13/crock-pot-sweet-potato-and-quinoa-turkey-chili/ and follow their recipe. I'm sure either version is just as good as the other.

*Note: You can buy quinoa rinsed or not, so make sure you check if it's been pre-rinsed before cooking it. The rinsed kind are a lot easier to cook with because when you have to rinse it yourself, it can make a bit of a mess because they're such small little balls, that they stick to everything. You can find bags of it at Costco or Sam's Club.

You'll need:
1 pound ground turkey
1 small onion, chopped
3 garlic cloves, minced
salt and pepper
4 cups chicken broth
1 28oz can crushed tomatoes
1 cup uncooked quinoa, rinsed
1 large sweet potato, peeled and chopped into small chunks
2 tbsp chili powder
1 tsp cumin
1/2 tsp salt
1/2 tsp paprika
1/4 tsp red chili pepper flakes In a large skillet, put a little bit of olive oil to coat the pan and saute the chopped onions 5-7 minutes. Add the ground turkey and sprinkle with salt and pepper. Cook until no longer pink. Make sure to break up the turkey so it's in smaller crumbles as it's cooking. Add garlic and let it cook 30 seconds more. Scrape out pan into your crock pot. Add remaining ingredients and cook on high for 3 hours or low for 6 hours. Check sweet potatoes to make sure they are tender, by sticking a knife through one. Pour into bowl and top with toppings of your choice.

*I topped mine with tortilla strips, shredded cheese and avocado. Fresh cilantro would've been good too.


*Save 1 cup of chicken broth to mix in when refrigerating it so it won't be dry when you reheat it.

Sweet Chicken (or Pork) Barbacoa


I don't eat fast food. The closest I get, is eating at Cafe Rio and there's only one thing that I get there every time I go: the Sweet Pork Barbacoa Salad. It is amazing. I'd eat it all the time if it wasn't so expensive and if it was a bit more healthier for me. I found a copykat recipe for it and thought I'd give it a try and hope that it tastes the same. It tastes pretty darn close. I've tried making this recipe a few times, a few different ways and each way came out tasting just as good. I tried going the little bit healthier route and using chicken breasts instead of pork. The original recipe in the link, uses pork butt, but my version will use chicken. You can always follow the link for the pork. They both taste great. http://www.onegoodthingbyjillee.com/2013/05/my-favorite-cafe-rio-copycat-recipes.html

The last time I tried this, I made the chicken and put it in lettuce leaves for a lettuce wrap feel and added a little bit of cheddar cheese, fresh cilantro, a couple slices of avocado, some cilantro lime rice and a few tortilla strips to give it that little bit of salty crunch. I've also made mine a salad in a taco bowl that I made from using my tortilla bowl molds and putting a tortilla in the oven to make it harden into a bowl shape.

You'll need:
4 chicken breasts
2 cans of Root Beer (I had a 2 liter bottle and used 1/2 of it)
1/2 cup brown sugar
1/2 tsp garlic
1/2 tsp salt
1/4 cup water
1 can diced green chiles
1 14oz can of enchilada sauce (red)
1 cup brown sugar

Marinate chicken in a mixture of 1 can of soda and the 1/2 cup brown sugar, in a reclosable bag. I like to marinate it overnight, but marinating it for a couple hours works just as well if you're short on time.

Drain the marinade and place chicken in your crockpot along with 1/2 of a can of root beer, water, garlic and salt. Cook on high 2-4 hours or low 7-8 hours. Remove chicken from pot and shred. At this point it should be easy to shred using two forks. If it doesn't fall apart easily, let it cook a little longer.

While chicken is cooking, in a blender preferably so you don't have big chunks of chiles, blend together the remaining 1/2 of can of soda, can of diced chiles, 1 cup brown sugar and the can of enchilada sauce.

Put the shredded chicken along with the sauce you just blended together, all back into the crockpot and heat through, for 15 minutes or so.


Thursday, March 5, 2015

Eggplant Parmesan

This is a fairly simple recipe. It's easy to make and it doesn't require a lot of ingredients.It's also a bit healthier than most recipes because you don't fry the eggplant, you bake it.

You'll need: 
1 medium to large eggplant
Jar of tomato sauce
2 cups shredded mozzarella cheese
1/2 cup parmesan cheese
2 eggs
Panko crumbs
Olive oil

Preheat the oven to 375. Scramble the eggs in a bowl and add a little bit of water to them so they're not as thick. In another bowl, pour in about a cup of the Panko crumbs. You'll probably need more, but it's better to use a little at a time so you don't waste much. Slice the eggplant in equal size slices, best at about 1/2 inch thick or you can slice them the long way too. Dip them in the egg mixture and then into the crumbs, coating both sides. Lay them single layer on a baking sheet and drizzle olive oil over them. Stick them in the over for 12 minutes. Take them out, flip them over and sprinkle olive oil over the other side and put back into the oven for another 12 minutes or until they're golden brown. Take them out and layer them in a baking dish:

 layer of sauce
layer of eggplant
layer of sauce
layer of cheese
layer of eggplant
layer of sauce
remainder of cheese

Put in oven for 15-20 minutes or until cheese is melted.

Monday, March 2, 2015

Chicken Salad

Everybody has their own versions of chicken salad. I've even tried a couple of different variations, but there was one recipe that mom used to always make for me when I was younger, that I just seem to keep coming back to. The amount of ingredients varies depending on how much you're trying to make, but you can eyeball it and add or subtract stuff if you want. The secret ingredient to this deliciousness is mango chutney. It gives it a slight sweetness.

You'll need:
1 cup chicken, cubed or shredded
1/2 cup chopped celery
1/2 cup grapes, cut in half
1-2 tsp mango chutney (I like extra)
1-2 tbsp mayonnaise or greek yogurt (depends on how dry or wet you like it)
salt and pepper

Shredded chicken works a lot better when trying to fit in a sandwich, but cubed chicken works too. Combine all ingredients in a bowl and mix well. If you have big chunks of mango in your chutney, you may want to chop them into smaller bits. If you want to take a healthier route, try using greek yogurt instead of mayo to cut out the fat. I've tried it and it was good, but it does taste a bit different. As pictured, I think it tastes really good on pita bread, but it can be enjoyed with many things: rolls, bread, crackers, tortillas.

Thursday, February 26, 2015

No Sew Tie Blanket


Now, I've always seen these awesome looking tie blankets, but never actually made one. After finding out just how easy they are to make, I wish I would've made some a long time ago. I saw some NFL fleece at Joanns on sale and thought it would be a great idea to make one for my boyfriend. He has a king size bed, might I add, so making a blanket to fit, wasn't easy, but I was up for the challenge because I knew it was something that he would enjoy and could actually use.

Here is the site I used for my guidelines of making this blanket. http://www.ehow.com/how_4811095_king-sized-fleece-blanket.html It has more detailed instructions. I'm just giving you some extra tips on the way I made mine, here.

Before you begin, keep in mind that this is for a king size bed so if you need to make it smaller, you will need to look up the measurements for the specified size bed. It is very time consuming though, so make sure you have a good amount of free time. Pick out what fabrics you want to use. You need 8 yards of the 60 in wide fleece, 4 yards per side. Mine was double sided and I made it checkered, so I ended up with 4 different patterns, 2 yards of each: Seahawks print, grey, lime green and navy blue. You can make them all match or do two that go together on one side and two that go together on the other side. I thought about doing that with one side representing the Seahawks for him and the other side representing the Cowboys for me. I then got some posterboard and cut out a 12"x12" square to use as a pattern and traced and cut 128 squares, 32 of each fabric. The blanket was 8 squares x 8 squares. Once the squares are cut, you need to cut 2" x 1"w slits along all 4 sides of each square as well as cut a 4" x 4" square from each of the four corners. This does take a lot of time to do so pace yourself. I was getting cramps in my thumb from cutting so much. Once everything is cut and ready to be assembled, it's smooth sailing the rest of the way. You'll need a good size open area for assembly. Place the squares in the pattern you want them so you know which ones get tied together and start tying. I did a double not on each one to make sure that they would stay together. Once you have one side done, work on the other side. When both pieces are done, you can tie them together by matching up the squares. I didn't do it with this one, but if you are making this somewhere where it gets pretty cold or if you're going to use it as a comfortable on a bed, you can add some stuffing in between the layers for more warmth.


This blanket can be washed. I know he's washed it quite a few times and it hasn't started to come apart or anything.

Soft Baked Pretzels


This is a copykat recipe of Auntie Anne's pretzels. I got the recipe from http://www.food.com/recipe/auntie-annes-pretzels-copycat-59462

You will need:
1 12 cups water, luke warm
1 14 tsp active dry yeast (1 pkg.)
2 tbsp brown sugar
1 14 tsp salt
1 cup bread flour
3 cups flour
2 cups water
2 tbsp baking soda
coarse salt

Toppings:
butter (melted)

cinnamon sugar
ranch dressing seasoning
sour cream and onion seasoning
cheddar cheese and jalapenos

Stir yeast into bowl of lukewarm water until dissolved. Add sugar and salt and stir to dissolve. Then  add flour and knead dough until smooth and elastic. Let rise at least 1/2 hour.
Let rise.

While dough is rising, stir together 2 cups warm water and 2 tbsp baking soda until dissolved. Set aside.
After it rises.
After dough has risen, divide dough into twelve equal pieces and roll into a long rope (about 1/2 inch or less thick) and shape into pretzel shape.
Dip pretzel in baking soda solution and place on greased baking sheet. Allow pretzels to rise again for 10 minutes. If you allow to rise too long, they will get pretty puffy and somewhat loose the pretzel shape, like some of mine did, but they taste just as good. Bake in oven at 450 for about 10 minutes or until golden.

Brush with or dip it in melted butter and sprinkle with coarse salt. You can also try sprinkling it with things like cinnamon sugar or Ranch dressing mix (powder). I thought about sprinkling some shredded cheddar cheese and slices of jalapenos on top as well, before popping it into the oven.

French Dip Sliders


Whenever I got to meet up with friends for lunch, we'd go to Applebees for their lunch specials. They had these little french dip sliders as one of their options and they were sooo good. I thought I'd try to come up with a recipe that was like them, but one that I could make at home.

You'll need:
King's Hawaiian Original Sweet Hawaiian Dinner Rolls 12 ct
12 slices of roast beef
6 slices of swiss cheese
Au Jus gravy mix packet (or can create from scratch)

You can use any other small slider size roll, if there's a different one you like. I like using the sweet hawaiian rolls because it adds a little more flavor with the sweetness. Preheat your oven to 350 degrees. Split the rolls in half, try to keep both parts attached. Fold up a piece of roast beef and set on slider. Rip a piece of cheese in half and lay on top the roast beef. Do this for all rolls. Stick in oven for 10-15 minutes or until cheese is melted and rolls are slightly toasted, take out of oven and put top of roll over the cheese, completing the slider. While they are in the oven, you can either make an au jus sauce from scratch or do what I did and buy a packet of the seasonings and follow the directions on the packet to make the gravy. Serve it in a little bowl along side the sliders so you can dip the mini sandwiches in it.

Monday, February 23, 2015

Crab and Shrimp Ravioli with a Saffron Cream Sauce

One day, before my boyfriend was leaving to his new base in Anchorage, he wanted to cook me a special dinner. He said anything I wanted, he'd make me. Now, being a person who likes to cook, I wanted to try something different and well, I really wanted to test his cooking skills, so I went online and tried to find the most complicated thing I could find for him to make me and I stumbled across this recipe for crab and shrimp ravioli. http://www.food.com/recipe/crab-shrimp-ravioli-with-saffron-cream-sauce-448376
It ended up being a meal that we cooked together rather than him making it for me because it was a bit tricky making the pasta from scratch, but it was a good lesson for both of us and it was a fun thing for us to do together.

I love crab and shrimp anything, but a saffron cream sauce? I had no idea what saffron was and had to look it up. It's not the easiest thing to find at the grocery store, at least it wasn't at the time we were trying this recipe out, but now I see it all over, at Sam's Club, Walmart, Costco. Maybe it's starting to become popular now? It usually comes in a little glass jar and it's red, but it's not very cheap. I think for a little jar of it, it's around $10, but it will last you a long time.

There are a lot steps to this recipe and it does take a couple hours to make, but it's very good and a great thing to make for maybe a special romantic dinner or maybe you have a fancy dinner party that you're hosting or something. Or if you're not doing anything and just feel like making a special treat one day for your loved one while they're at work or your family. One thing that comes in handy when making this, is a ravioli stamp. We didn't have one when we made these so it took a little longer to cut the dough and they weren't exactly the same size. They were close, but if you can find a cheap stamp on eBay or at Marshalls or something, it'll save you some time and make them look prettier.

 You can buy pasta sheets that would take a load off your time and work, but I wanted to attempt to make pasta dough from scratch. If you choose the easier route, you can skip the first steps and go right to the filling. Before you start, get the 14 tsp saffron and soak in 1 tbsp water for 2 hours.

For the pasta:

1 12 cups all-purpose flour
4 large egg yolks (save whites, put them aside)
12 tsp sea salt
1 tsp olive oil
2 -3 tbsp water
4 tbsp flour

For the filling:

16 oz ricotta cheese
1 cup lump crabmeat
20 large shrimp, raw, deshelled
2 tbsp butter
3 garlic cloves, minced
12 cup parmesan cheese
salt & pepper
1 tsp thyme

For the sauce:

2 tbsp butter
1 12 tbsp flour
14 tsp saffron
14 medium onion, finely chopped
1 12 cups chicken broth
3 garlic cloves, minced
1 cup dry white wine
34 cup heavy cream
salt & pepper
12 cup lump crabmeat
14 cup parmesan cheese (garnish)
1 tbsp parsley (garnish)


To start, you need to make your pasta dough. On a clean surface, make a mound with flour and create a well in the middle for the eggs. Pour egg yolks into the well of flour, along with the olive oil, salt and water. Gradually mix in flour towards the middle until all of it is mixed into the eggs. Add another tablespoon or two of water if the dough is too dry. Knead dough for 10 minutes until dough is smooth and elastic. Prepare filling while dough rests. Wrap the ball of dough in plastic and let it rest for 30 minutes.

Sautee shrimp with butter and garlic until cooked and then remove from pan. Chop shrimp into 1/4" pieces and scrape out eveything from pan and mix with ricottta. Add crab meat, parmesan cheese, salt, pepper and thyme and stir until mixed together. Set aside.

Bring 4 quarts of salted water to a boil. Cut dough in half. On floured surface, roll dough to make a thin sheet (about 1/16" thick) or if you're using pasta sheets, get them available now. Cut rounds using a ravioli stamp or the top of a glass. Brush the edge of each piece with reserved egg white. Fill each piece with about 1 tbsp of filling. If you used the top of a glass to cut your ravioli, fold over and pinch shut, making sure the pasta is completely sealed (will look like the picture above). If you have the stamp, take a second cut out and place over the first and seal the edges together with the egg whites, pressing firmly so filling doesn't come out.

In a large pan, over med-hi heat, sautee butter, garlic and onions 2-3 minute. Whisk in 1 1/2 tbsp flour to create a "roux" or a thick paste. Add wine and reduce 2-3 minutes. Add saffron, chicken broth, heavy cream, salt, pepper and crabmeat, cook 3-5 min until sauce is thickened & bubbly.

Boil ravioli 3-5 minutes until done. Gently remove and add to sauce. You can either toss  the ravioli in sauce until coated or do I like I did and pour the sauce over the center of the ravioli on the plate and garnish with parmesan cheese and parsley. Enjoy!


 *We served ours with sauteed green beans with garlic and sliced almonds.

Sunday, February 22, 2015

Spicy Peanut Noodles


I am a huge fan of any kind of asian and asian inspired foods and when I was younger, my mom came up with this spicy peanut chicken noodle recipe and I absolutely loved it. She never really measured ingredients, kind of just eyeballed stuff, but I finally sat down and tried the best I could to come up with an actual recipe. The two biggest things that can be altered in this is how spicy you want it and how strong of a peanut taste you want. I know there's a long list of ingredients and that might intimidate you if you're not used to cooking, but it's really not as hard as it looks. Plus you have your meat, pasta and vegetables all in one dish.

You will need: 
 1/2 bag of lo mein noodles (about 7oz)
Canola oil
1 lb boneless skinless chicken breasts, cut up
1 tsp fresh ginger, minced
1/2 tsp garlic, minced
1 tbsp soy sauce
2-3 cups shredded cabbage
1/2-1 cup celery, sliced thin
2-3 cups bean sprouts
1/4 cup scallions, chopped

 For sauce:
2 cups chicken broth
4 tbsp peanut butter (add more if you really like the peanut taste)
1/2 tsp red pepper flakes
1 tbsp soy sauce
2 tbsp water/cornstarch mix
1/2 cup peanuts, chopped (garnish)
1/2 cup scallions (garnish)

Combine soy sauce and garlic, set aside to marinate. Cook lo mein as directed on package. You can cook the chicken two ways. In the picture above, I had some left over shredded chicken that I threw in, but normally I would cut up the chicken into bite size pieces and cook in a skillet with a little bit of oil, until no longer pink. Add celery, then other vegetables (cabbage, bean sprouts, scallions) and cook until tender. Take out of skillet.
In the empty skillet, add chicken broth, peanut butter, red pepper flakes, soy sauce, garlic and cornstarch mix. Cook until thick sauce forms. *It helps to heat the chicken broth and peanut butter in the microwave first to melt the peanut butter. Put the chicken, pasta and vegetables back in the skillet and mix well. Garnish with chopped peanuts and scallions. *I also like to add extra chopped peanuts into the pasta because I like the extra crunch.

Saturday, February 21, 2015

Ugly Sweaters

Christmas ugly sweaters are fun to make. Nobody wants to walk into a party or into work and see somebody there with the same sweater. A couple years ago, I had to just throw something together last minute and decided to just get a sweater from a thrift store and go to the dollar store and grab a bunch of cheap, tacky, Christmas stuff and glue them all onto the sweater. Well, since then, I've gotten more creative and actually took the time to come up with a clever, ugly sweater. I hope these will inspire you to create your very own ugly, tacky Christmas sweater.

These I made for my friend and I who needed a last minute idea for a party.


This one I made for myself this past December for the ugly sweater 5k and an ugly sweater party (which I tied for 1st place).


Those Cute Lil Snowmen


Growing up, my mom got the idea to make all our Christmas cards for family and friends. She came up with the idea of making the cards into the shape of snowmen and then getting fabric strips and foam and buttons and anything she could find, to decorate them. It's pretty easy to cut a snowman out of some posterboard or cardstock and then you have the chance to decorate it any way you want and even have the kids help.

For a few of the necessities, I found certain things that work better than others. For the scarf, a thin strip of fabric works best. You can buy some scraps or maybe you have some laying around that you can cut up. For the nose, it's easy to buy a sheet of orange foam and cut a carrot shape out. For the arms, brown pipe cleaners work wonderfully. The rest is up to you, button or bead eyes, or even the squiggly eyes you can buy, felt or paper hats or even no hat and a pipe cleaner for antlers. The possibilities are endless. Have fun with it, like I did.

Red, White & Blue shirt


This past year I wanted to go all out on the 4th of July since I was going up to Oregon to spend it watching fireworks on the beach. I couldn't find any patriotic shirt that I liked, so I decided to make one myself. Old Navy had a sale going on where tank tops were only $2.50 so it was perfect to decorate. I got some fabric paint, painter's tape and some star stickers and got to work. I think the whole shirt cost me under $10.


Painter's tape worked perfectly making just the right width for the stripes and to block off the square for the stars in blue. What I learned worked, was if you put the star stickers on first and make sure they're pressed down good on the shirt, you can paint around them with the blue paint, just be careful not to have too much paint on your sponge or brush, where it would leak under the stickers. Once it's all dry, carefully remove the stickers and paint and you're done. It really didn't take a whole lot of time to do. The longest part was probably putting the painter's tape on, making sure the stripes were straight and letting them dry before painting the blue square.


Bacon Wrapped Crab Stuffed Shrimp

Bacon...Crab...Shrimp...what more can you want? These things are amazing, one of my favorite things to make, but they definitely make you work for them. Yes, they aren't the healthiest of foods and I try to stick to healthier options, but I can't say no to these from time to time. You want to impress a date or a loved one and prove to them that you can make something delicious? Then these are the perfect bite sized treats. I will say tho, that they do take a bit of time and can get a bit pricey depending on seafood costs where you live, but it makes a good amount.

I've tried making this recipe with colossal shrimp (the biggest I could find) and I've also used jumbo and extra large. I wouldn't go smaller than extra large tho Jumbo are a lot cheaper and you get more for your buck. I like having the smaller ones and having a bigger quantity of them because then you get more bacon and filling per bite. I guess it's just a personal preference. If you're going for presentation, I'd use colossal. They just take a little longer to cook in the oven.

The original site I got the recipe from was http://foododelmundo.com/2009/08/25/bacon-wrapped-crab-stuffed-jumbo-shrimp/ I will always credit my sources because if it wasn't for them, I'd probably never have thought of it, but I like to add my own little twists, especially if I try making the recipe a few times with different variations.

The original recipe uses Jumbo, but you can adjust for extra large if you want smaller ones. I want to say the extra large you needed about 20, give or take a few. It also depends on how much you stuff them. Make sure you peel and devein them. I like to leave just the tails on. It also helps to cut a little deeper down the backs of the shrimp to give you more room to fit the stuffing in.

Along with the shrimp, you'll need a pound of bacon. I cut my slices of bacon because when they wrapped around the shrimp multiple times, sometimes the inner layers didn't get very crispy and I like my bacon crispy. The amount of pieces you cut them into all varies on the size of shrimp you're using, but they should warp around at least once to make sure the filling is held into place.

For the filling:
 1 lb crab meat (I use a crab that comes in a can kind of like tuna fish)
 1 egg
 1 tsp Worcestershire sauce
 cayenne pepper (you only need a pinch, but can add more if you like it spicy)
 1 tsp salt
 1/2 cup bead crumbs
 1/4 cup mayonnaise
 juice from 1/2 lemon
 1/4 tsp garlic powder (I like fresh chopped garlic)
 1 tsp dried mustard

Combine together all these ingredients until it forms a crab cake like mixture.

Stuff the shrimp with as much filling as you can without it falling out all over the place. If you end up with extra crab mixture, I like to make mini crab cakes and stick them in with the shrimp to cook. Wrap the bacon around the shrimp, holding it all together and stick a toothpick through it.

*Tip: It always helps to soak the toothpicks in water first, so they don't burn in the oven.

Lay them on a cookie sheet, I cover mine with aluminum foil and stick them in the oven on broil for a few minutes. Keep a close eye on them because when broiling stuff, it can burn quickly. Once one side is browned, take them out and flip them over. Put them back in for a few more minutes until the other side is brown. If you don't have a broiler option, you can put them in the oven at 400 degrees for 5-10 minutes until they're browned, flip and repeat.


Funnel Cakes

Funnel cakes can get pretty pricey at carnivals and fairs, but if you take the time to make them at home, you can make a lot for less than the cost of one funnel cake at a fair. This is great if you have company coming over or just a big family and want to have a sweet treat without spending a lot of money. Plus you can also get whatever toppings that you like to put on them. I love banana pudding with pieces of bananas, vanilla wafers and whipped cream. But just powdered sugar and homemade whipped cream is just as good. The best utensil you can use to make these, is to get a little plastic funnel, I get mine fromthe dollar store and make sure you strictly use it for cooking.

For the cake:
 3 eggs
 1/4 cup sugar
 2 cups milk
3-4 cups flour
1/2 tsp salt
2 tsp baking powder

-Turn stove on med-high heat and fill pan with canola oil. Fill funnel up with batter and drizzle around the pan. I'm sure you already have an idea of what a funnel cake looks like or you can refer to my picture, to get an idea of how to drizzle the batter. There's no really right or wrong way to do it, you just want it all connecting in the pan. When golden, flip. When both sides are golden, remove from pan with tongs, place on a plate and sprinkle with powdered sugar or whatever toppings you choose. Best served when hot.


If you want to make fresh whipped cream, which I think tastes a million times better, all you need is some heavy whipping cream, powdered sugar and vanilla. Get out your mixer with the whipping attachment, a handheld mixer will work as well. For a pint of cream, I'd use a tsp of vanilla extract and maybe 1/4 cup sifted powdered sugar, but I add a little at a time and taste it until it's to my sweet liking. Whip it for a few minutes until it has a thick whipped cream consistency.

Cake Pops are In

I wanted to make my boyfriend and my brother, awesome birthday cakes, but I know sending a cake in the mail from Las Vegas to Alaska or Las Vegas to New Jersey, was not going to look like a cake when it got there, so I had to come up with a solution to get something to them since I wasn't going to be able to be there to help them celebrate. Then I remembered the new trend....cake pops. I used to always wonder how cake pops were made because they were so cute. I tried buying the cake pop maker, but that just made little doughnut hole type things and they never tasted like the cake pops that I would eat out places. After some research, I realized I was making them all wrong. If you don't know how to make them, the simple way is to make a cake, any flavor that you like, make a batch of icing, in the flavor that you prefer (a half of a batch of icing would probably be more than enough) and get some chocolate melts that you can find at your local Walmart or any craft store by the cake decorationg supplies and that's all you need.


When the cake is cool, crumble it up and mix it with the icing, little by little until there's enough icing that turns the crumbs into a sticky dough like texture. Then you can start rolling balls like you would if you were making meatballs, put them on a tray of parchment paper and pop them in the freezer for 15-20 minutes until they're firm and wont fall apart.


Get a stick, ones that you can find with all the candy making stuff, and stick one in each ball. I've learned that it helps if you put a little icing on the end of the stick before you insert it in the ball and then put it in the fridge for a few minutes to set. It keeps the ball from falling off the stick when it comes time to coating it in the chocolate. I've found it helpful to cut those sticks is in half if you get the long ones.


If you can't find the sticks or just want to make them look like little candies, you can make them into just cake balls like I did and put them in the little paper cups and make them look fancy.


While the balls are firming up, get some melting chocolate coins and microwave them to melt them (see instructions on package). Make sure they're melted enough because if the chocolate isn't soft enough, it can break apart your cake ball.

There's so many good flavor combinations out there, that it was hard to pick one to make and I knew they each liked different things. So what does any good girlfriend/sister do? I make a few different flavors and send them a few of each. Who doesn't like a variety? I ended up making:  

-carrot cake with cream cheese icing, which are the orange ones pictured above with the little bit of green sugar on top and the orange white chocolate coating to represent a carrot
 -pumkin spice which were a pumpkin cake with some of the leftover cream cheese icing and covered in orange white chocolate melts that were pumpkin spice flavored. They didn't melt as smooth as regular chocolate melts, but they still were delicious
-birthday cake which were yellow cake with sprinkles and a vanilla buttercream and white speckled chocolate melts
-peanut butter/chocolate which were a peanut butter cake with peanut butter buttercream and covered with milk chocolate melts
-smores (they were the favorite) which were a chocolate cake with a marshmallow buttercream, covered in milk chocolate melts and rolled in graham cracker crumbs

These weren't hard to make at all, they're just a little time consuming. They're also great if you accidently overcooked your cake and it's a bit dry, nobody will ever notice when they're turned into cake pops.

Wednesday, February 18, 2015

Cilantro Lime Rice


I love wild rice, but it's not the easiest to find and it sure isn't the cheapest either. I came across a mix from Bob's Red Mill at a place called Big Lots, that has both wild and brown rice in it and it's perfect for any kind of rice pilaf. I like to use this mix and throw it in my rice cooker. This recipe, you can use white or brown or a mix if you have it and you can put it in a rice cooker or cook it on the stove according to the instructions on the package. It's a fairly simple recipe.

All you need is:

Rice - whatever kind you want
Fresh cilantro - chopped
Salt
Limes or lime juice ( I keep a bottle of lime juice in the fridge)
Oil - whichever kind you use: olive, canola, vegetable

Cook the rice like you normally do, but add a teaspoon or so of oil. While rice is cooking, chop up the cilantro and squeeze the juice from the limes, if you're using fresh and set aside. The amount you need is all based on how much rice you're cooking and if you prefer your rice with extra cilantro or more sour or more salty. On average for two cups uncooked rice, I use 1 bunch of cilantro 1-2 limes and maybe a half to a teaspoon of salt. When cooking, it's always best to try your food as you go, tasting for the right amount of each ingredient. When the rice is done, add cilantro, salt and lime juice, little at a time, mixing and tasting in between because you can always add more on something, but you can't take it out. Taste it. If it looks or tastes too dry, you can always add a tad more oil, just enough to coat all the rice. And there ya go, cilantro lime rice.